Note: Microsoft Frontpage Users
Customers with Microsoft Frontpage extensions installed on their sites should use only the Frontpage publishing feature to transfer files. Using regular FTP can corrupt the extensions, disabling the functionality of the Frontpage web and requiring that the site be deleted to reinstall the extensions.
- Open your WS_FTP program.
- On the Session Properties screen, click on the General tab. Here you have several fields that you need to fill out.
Profile Name: Enter the name you want to know this profile by. Your domain name is commonly used here
Host Name/Address: This is example.com, where example.com is your actual domain name. You may also use your IP address to upload files to the server before the domain name transfer or registration process is complete.
Host Type: Make sure Automatic detect is selected.
User ID: This is the FTP Login assigned to you by Sidetrips.
Password: This is the FTP Password assigned to you by Sidetrips.
Please refer to your Welcome Letter for this information.
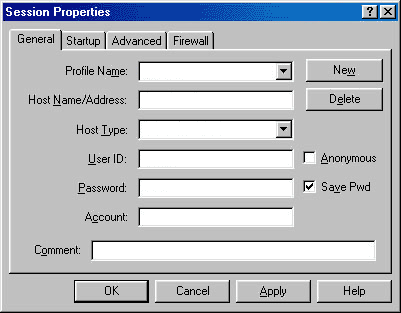
- Click the Apply button and then the OK button.
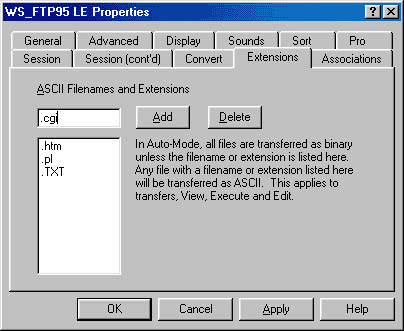
- You must configure the ASCII extensions so that your text based files will transfer correctly. Get to this window by clicking Options at the bottom of the main window and selecting the Extensions tab. Here you enter .htm, .html, .pl, .txt, .cgi or any other file extensions that need to be transferred as text.
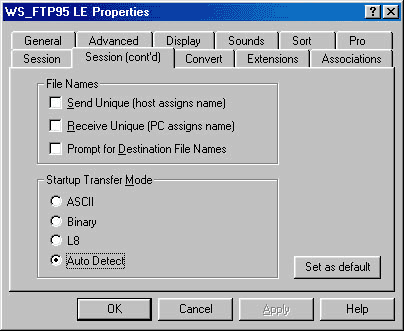
- Click on the Session (cont'd) tab and select Auto Detect under the Startup Transfer Mode.
- Click Apply and OK.
- To upload or download a file, highlight the file, and click the Arrow buttons in between the window that points in the direction you want it to move. In other words, to upload, click a file in the left box, and click the arrow pointing to the right, and it will appear on the right.
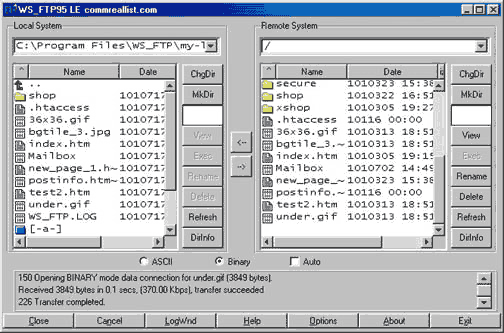
Left Window
After logging in to your account �WS_FTP will now display a split screen. The window on the left
contains the folders and files on your own computer. Use the green arrow at the top of the window and
the scroll bars to browse your system to locate your website files.
Right Window
The window on the right will contain the folders and files contained within your home directory. This
is your space on the server. This is where you will place your website files.� You will see a file
named 'place_your_website_files_here.txt' for confirmation.
Binary vs ASCII or Auto
You will see two radio buttons below the display windows, one labeled Binary and one labeled ASCII .
There will also be a check box labeled Auto. If you select Auto WS_FTP will automatically apply the
correct setting, either Binary or ASCII to the document you are transferring.� If you elect not to
use the Auto setting please note that it is very important to transfer images in Binary mode.�
Everything else, HTML documents,� cgi scripts etc. should be transferred using ASCII mode. If you
fail to set this correctly your files may not appear as they should.
Upload Files
-
Double click on the public directory in the right window to open it.� This is the directory to which you
will upload your web pages, files, and images.
-
Windows NT/2000: place your files in the '/' directory as this is your public directory
-
Linux : place your files in the /htdocs/ directory as this is your public directory
-
Highlight a file (or files) from your computer in the left window.
-
Click the right arrow button (->) in the center bar between the windows. That's it! Your file
transfer is complete.
Download Files
-
Double click on the folder you want to download files into on your computer to open it in the left
window.
-
Highlight the file (or files) you wish to download from your website in the right window.
-
Click the left arrow button (<-) in the center bar between the windows. That's it! Your file
transfer is complete.
Create A New Directory
To create a new directory on your website, click on the MkDir button when you are inside the public
directory or a subdirectory of the public directory. You will be prompted to enter a name for the new
directory. Once you do this, the new directory will be created.
Multiple File Transfer
To transfer more than one file at a time, highlight the first file, then hold down the Shift key on
your keyboard to select more. All highlighted files will be transferred when you click on the
appropriate arrow button to begin the transfer.
Disconnect
When you are finished transferring your files, click on the Close button at the bottom of the WS_FTP
window. This will close your FTP connection.
More Information
|
|